
Hey all!
So, just wanted to get some advice...
I am thinking about painting the Potter minis, and I have to admit I am having a recurrent nightmare about the frosting up when I varnish them.
So I figured maybe I should buy some brush-on matte varnish for them and brush it on... would that avoid frosting?
Also, does anyone know of any brush-on matte varnishes that they could recommend?
Thanks!
Sunday, November 28, 2010
Saturday, November 27, 2010
First photos of Harry and Co...

 Well, Soapy sent along these first few shots of the work on the boy wizard and his pals... and holy moly. I am so impressed. It is really amazing to see what skilled hands can do with an idea... and I am so jealous!:) If I could do that, I'd have an entire Usagi Yojimbo set done, and then a set based on my buddy's comic book Wok-Man... oh man, the possibilities would be endless:D
 But for now, here are some shots for folks to check out! At the top is Harry, obviously reacting to a baddy and whipping out his wand to fire. Hermione is to the left... she will be reading a book, and have over her shoulder her little pack of books, scrolls, and the like. Ron is to the right; he is currently missing his back arm, in which he'll be holding a broom.
 Overall I think they look AMAZING so far, and I know my wife will really love them. I feel like I should be including my first-born in the payment, but I am not so sure Soapy would want him... whenever he comes around, that is:)
As for other parts of the project... a SUPER kind gent from Finland actually offered to mail over to me an owl that he has left over from a Warhammer kit... SUCH a kind offer! That guy will get a coat of white paint and be made into Hedwig the owl. I am currently thinking of a way to "pay it forward," and keep coming back to three or four Perry French Napoleonic Sappeurs I have lying around that I'll never use... maybe someone out there can us them? Also, after getting a recommendation from Steve The Wargamer I found a FANTASTIC LED set that makes a "flickering fire" effect, so the fireplace will have an actual fire in it! Exciting stuff:) Oh, and I gave the walls and fireplace a nice wash of Dip, and HOLY cow they look FANTASTIC... AMAZING what a difference it made... they just look so dark and realistic now. I am very pleased with it.
Anyway, more info as stuff gets done... thanks for coming by!
Friday, November 26, 2010
Some help from Finland!
Hey all!
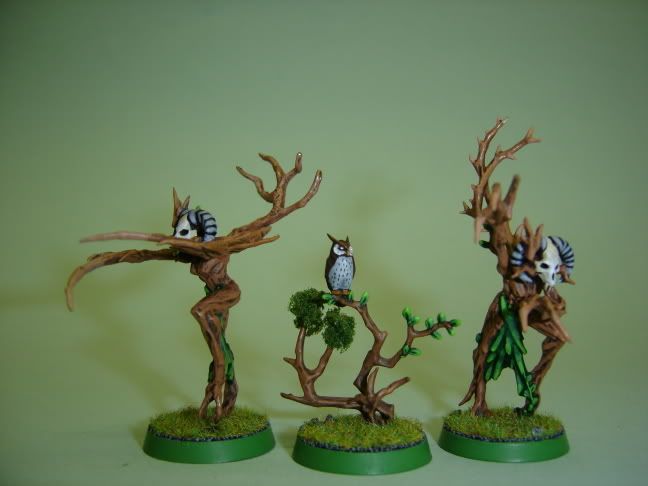
Well, I was looking for an owl to use in the Harry Potter display base that I am working on for the wife... it is a surprisingly hard thing to find! There were a few pointed out to me over on TMP, but I wasn't THRILLED with them... they are all a bit small and "wimpy" looking.
However, then someone pointed out the owl in the center of this shot, from the Warhammer Dryads boxed set... and THEN said they had an extra and would mail it to me!
And where is this person mailing it from?
Finland!
And yes, free of charge:)
Anyway... it is really awesome that someone would do such a thing for a fellow gamer... so thank you so very much! I'll have to pay this forward somehow... is there anyone out there who needs some Perry Napoleonic French Sappeurs or something?:)
Monday, November 22, 2010
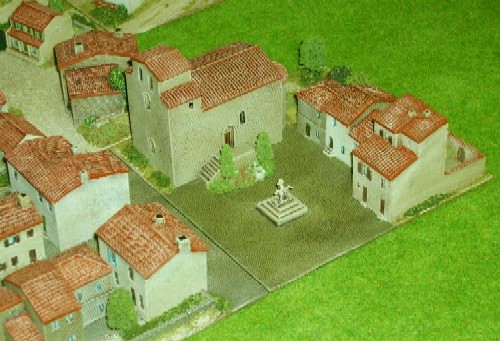
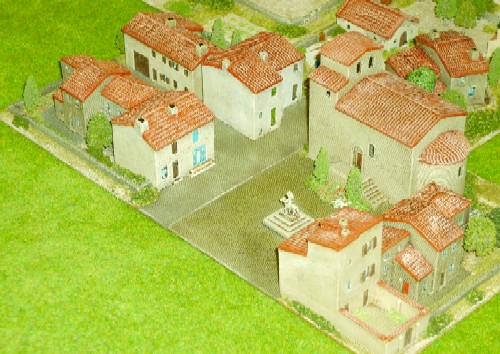
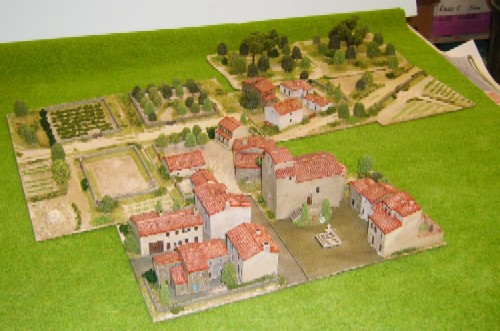
10mm Napoleonic Spanish farmstead nearly done...


Thoughts, as always, welcome!
Sunday, November 21, 2010
The portraits for the Harry Potter display case

Well, got five paintings done. I think I'll do one more, although I have to figure out what the topic should be. Clockwise, starting with the right... the big one is Dumbledore asleep... the portrait came from after he died. Then there is a copy of an actual painting we have on our wall. Next is a shot of Harry's parents, taken from one of the movies. The oval frame is The Fat Lady, who guards the entrance into the Gryffindor Tower. The last one is a portrait from the Uffizi that I thought simply looked right.
I have one more of the smaller rectangle frames that I'll probably do a picture for... I feel like seeing all of these paintings together looks great; very Harry Potter, so I want as many as I can get:) I am not sure if I'll pick a Harry Potter themed one (which can be tricky) or if, instead, I will just find a decent painting from history.
Saturday, November 20, 2010
Food

Yep, a ridiculous dinner. Bacon-wrapped, balsamic vinegar and rosemary marinated filet mignon, claws and tails from 2lb lobsters with a stick and a half of butter each, salted baked potatoes with shredded cheese, sour cream, and a minced piece of bacon on each one, and steamed sweet baby peas. It... was... RIDICULOUS. Oh, and EVERYTHING got dipped in butter.
Some 15mm Cowboy buildings

 Well, hot on the heels of some REAL Western firearms, here come the first few shots of my buddy's 15mm Western setup!
Now, if you have ever seen any of his stuff, you will know... he does it up BIG. He never just casually gets into a collection; instead, he just goes out and buys a LOT. And it is always good.
So, the latest thing he wanted to do was a 15mm Wild West table. He promptly went out and got cowboys, civilians, indians, buildings, a fort, several hundred trees, mountains, a train, animals, and about a thousand other little things.

The first two shots are about half of his buildings... he got all of the Blue Moon sets, and a few others. The interiors so far are basic; he did cardboard versions of the inside windows and doors. He DOES have furniture for everything, but that will likely wait. They aren't COMPLETELY done yet, as the windows haven't been done (they will likely have writing and stuff on them) but this is basically how they will look!
 The last shot is actually some of the mountains he made. The idea is the table will go from mountains/forest to forest to plains. The mountains are a mix of prebought foam mountains that he then attached to Christmas Tree store "stone" display stands. You can see the last remaining unfinished mountain in the corner. A LOT of foam work, and they basically melded together! The ones with the flat areas will be perform for mining areas and gang hideouts.
Anyway... he rarely takes photos (he doesn't have a really good camera) and he rarely updates the blog, so at least here is a peak until he does!
Thursday, November 18, 2010
A couple of real-life cowboy guns...


In anticipation of some upcoming 15mm Cowboy shots, I thought I'd post a few REAL toys a buddy of mine picked up... figured folks might enjoy these! The .45 rounds they fire are just ENORMOUS... such a funny round to see next to the modern day stuff, which seems so small in comparison!
The pistol, btw, is a Colt replica... the rifle is a Winchester Yellow Boy.
Monday, November 15, 2010
A first attempt at putting together my 10mm Napoleonic Spanish buildings...

 Based on plastic, spackled in, a little sand to give texture to the parts that won't be flocked, put in a few bits of bark for rocks on the back side of the main farmhouse... I hope it looks good when I paint it up! I will be particularly curious how the sand takes a drybrush... was it really needed, at this scale? And is the grit too big for this scale? Oh well, live and learn.
BTW, I am going to flock the tree that is sculpted along the house... some green licheny stuff should work out nicely.
In addition to this, I have a larger church piece, and then a few random little houses. I am also going to do an orchard, using the walls I have... I would love to do two, but I don't have enough walls. Lastly, I am going to do a few grape vine covered hills.
Uh oh... Soapy seems to have disappeared from email...
Oh no.
Soapy, who kindly accepted sculpting my wife's sole Christmas gift, has been AWOL from email recently. Hopefully he has just been busy, or maybe the emails are getting stuck in a spam box, but I hope it isn't anything serious... I don't have any other gifts planned, and more importantly I already almost finished the display base! Plus, you know... I hope it isn't anything serious for HIS sake:)
Danger, Will Robinson!
Sunday, November 14, 2010
Color suggestions for my 10mm Napoleonic Spanish buildings?
 Hey all!
Well, I have to paint these guys up... my 6/10mm Napoleonic Spanish buildings. I don't really have great paint colors for them, so I am stopping by the store on Tuesday to pick a few up. However, I wanted to ask... does anyone have any recommendations for them, colorwise, from the GW range?
I am thinking of doing the roof tiles in EITHER Mechrite Red or in the Solar Orange, both of which are foundation paints. I'll do the exposed bricks on the buildings in the same, I suppose... are Spanish bricks the same color as traditional bricks? I am not sure about the buildings themselves... probably Bleached Bone should work. Then dip them, and done.
So what do folks think on the roof tiles? Red? Or Orange? Remember they will be dipped...
Tuesday, November 9, 2010
More work done...

Here is the latest... still need to finish up painting the fireplace, walls, telescope and book, but I gotta hit the sack for now.
The walls and fireplace in particular I need to think on... I may actually give them a brush of dip, just to mute the colors a bit and pull them all together. As they are now I don't love them, but I think the dip will help.
A lot of work to go, but it IS coming together a bit...
Moving along on the project

Well, above is the latest... the walls are not glued down or anything, and I still have some work to do...
Plus, I am a bit stuck on a few bits... for example, how do I secure the ends of all the foamcore? I am thinking I will paint the ends with a sand paint I have, and then paint it gray. I also have to build the outsides in the back... do I do THESE out of foamcore also? Or do I line the inside of the plastic box with simple black paper? Oh man... so man questions.
The floor, I think, looks okay. Drying it warped something FIERCE, but it looks like it isn't all that noticeable... I think:D
CRAP. I fucked up. Just realized... when I put the top pieces on, the plastic rock walls should go up to meet the top. The ones I cut are too short by the width of a piece of foamcore. Shit. Now I have to recut the blocks. Damn.
So. That's it. Now I am going to undercoat the walls and unpainted stuff (fireplace, logs) black.
I also will have a bunch of stuff leftover... wizard study stuff... I'll post what it is later, and if folks want to buy it...?
Monday, November 8, 2010
Some help needed...

Well, picked out some of the interior stuff for the display base I've been talking about. It is supposed to be the inside of a castle, comfortably furnished.
So! Now I am stuck... which sheets do I use for each thing?

Okay, above is Wall Option 1. It is a more random, field-stone sort of pattern. Unfortunately I did not put a figure in for scale; if I should, just tell me. The stones are NOT that big, which is the main thing that holds me back... they would use BIG stones for a castle, no?

Here is Wall Option 2. These are, technically, cinderblocks, and therefore modern, but they are a good bit larger than the stones above. Plus, I think castles are built using regular blocks, not stone like a house.
Okay... because option 1 was KILLING it, and because I am honestly worried about scale with option 1 for a CASTLE wall, I am including this scale shot of a 25mm Perry figure along with both.

A shot of a castle wall, with a strange lady sitting in front of it...

On to the floors!

Here is Floor Option 1. These are smaller, rounded stones. Good for a castle?

Floor Option 2. This is actually a paperish sheet of hardwood design. Not as nice, maybe, as planking it with balsa, but it has a nice grain and color AND is a bit easier... I am not sure that you would even be able to tell when all is said and done.

Floor Option 3. Actually doing the floorboards out of balsa. More work for sure, especially when I have to plank round bases, and I am not sure the textures will look nice.
Anyway... I am putting a POLL up on my blog, so if you folks can give me some help, I would TRULY appreciate it!
Below, btw, is Wall Option 2 and Floor Option 2.

Sunday, November 7, 2010
Some early work done on Harry Potter display base...

 Hey all!
Well, I got a bit of work done on the stuff that will help make up the display base for the Harry Potter figures I have coming...
First up, I had to use a bit of green stuff to make The Sorting Hat, and to make a cloak to drape over the chair... it will be the Invisibility Cloak.
Next up I painted everything up and put it in place. I did a quick rough of how things will look as they get going... give it a look!
Two painting notes... first, I don't know what color to paint the "shroud" of the lamp on the desk... any advice?

Second... the invisibility cloak is going to be a real, real tough one. If anyone has any advice on how to paint it, I am ALL ears!
The frames (I ordered about 8 of them) and a few other pieces (a telescope, a spare chair, the fireplace and accessories, a few other bits) are on their way... I'll have more as I get it done!
Saturday, November 6, 2010
More plans for the Harry Potter figures...

Thought I would post the two more recent sketches for the Harry Potter figures that I am getting for my wife for Christmas...
I put together a pair of more detailed sketches... one of the three characters themselves, and one of the display base I am going to make for them.
The figures will be mainly in blacks and flesh tones, with some wood and other random colors. I'll be using yellows and reds as spot colors... red for Hermione's book (and possibly a tan pant,) a yellow and red Gryffindor scarf for Harry, and red hair and a tannish/yellowish tipped broom for Ron. I figure the colors will help tie them together a bit.

The display base will be quite an undertaking... I am going to paint it to look like a room in the castle. I picked up a slew of frames from a doll house place and will be doing portraits all over the room much like the books and films feature... I'll be sure to include one of Dumbledore sleeping, and probably one of the Fat Lady. I've also got a fireplace, telescope, and shelves coming, and already have a rolltop desk and some other shelves. I plan to do the fireplace with a cutout so it looks particularly deep, and then the window will be cutout too, with a slit in the top of the box in order to let some light in... I plan to have a moon and some towers of Hogwarts in the window. I'm going to do a wooden floor out of balsa planks, and possibly a carpet as well, although I'll have to think about how to pull that off. I also plan to sculpt the Sorting Hat out of greenstuff, and I am going to drape a cloth over one chair and then paint it to look like the chair underneath it in an attempt to convey the feeling of the Invisibility Cloak... we'll see how that turns out!
So... overall, I hope it turns out great. I have infinite confidence in Soapy's sculpting ability.... not as much in my own ability to pull off the
Fall In 2010: The Purchases
Hey all!
Well, here is my final Fall In post... the purchases!
Now, I had a very small selection of things that needed buying... with the wife's Christmas present taking up all my available "fun" money I knew there was not a lot of wiggle room.
Still, that doesn't mean I bought NOTHING!

First up, the major purchase was a collection of 10mm Spanish buildings from Battlefield Terrain Concepts... namely some Timecast stuff. This will enable me to do some battlefields in Spain, and frankly will up the table a bit; they are nicely detailed and will look good.

I also bought a few things of Timecast walls to go with my Spanish buildings. It is a decent amount of wall, with an example of each piece here... they include some ruined wall, walls with a gate, and walls with a small, personal gate. I am tempted to permanently attach some of them to some sort of base, but let's see what happens.

I also picked up some coarse flock to mix in with my table scatter; it looks pretty good on there right now... it gives the flock a nice "depth." I also picked up some lances for my 28mm Russian Cavalry... however, I only need a few, so if you are interested in buying the remains off of me, lemme know!

I picked up a few things to read, including a Wargames Illustrated (maybe not a smart purchase... there are no eras I am interested in in it) and Sharp Practice (maybe also not a smart purchase, as I probably won't play it, and I hadn't seen before that there are no photos! Oh well, live and learn.)

Last up I picked up a few packs of furniture from a vendor... I don't remember who, but I did think that one of the guys who worked there was a bit rude. Anyway, I picked these two packs up to decorate the display base for the Harry Potter figures I am getting for my wife for Christmas. I still have some more pieces coming, including a telescope, some more shelves, a fireplace, and a bunch of frames for the portraits on the walls.
So... that's it! As I said, not a huge spending Fall In, as there wasn't a ton that I really needed for current projects, but still, fun as always!
Tuesday, November 2, 2010
Fall In 2010: The Games

Hey all!
Well, here is part 2 of my Fall In coverage... namely, the games themselves!
Unfortunately I only have photos from Saturday, but still, a lot of fun I hope!
First up... we found this game in the main hall. At first blush, it is an ancients game... but when we looked closer, we realized that it didn't actually use traditional miniatures!

Nope, instead both armies were handmade out of simple wooden shapes and pieces!

Both armies featured pikes, skirmishers, cavalry, and even war elephants. However, they were made of tons of bits, including the tops of pins and spools for thread!

Honestly, I think this collection was one of the coolest wargames bits I've ever seen!

Each army came with its own movement trays that were carefully painted, rather than being flocked. Normally I am all for flocking, but I thought these looked spectacular.

Here is a shot where you can see both the elephants as well as the infantry...

And finally, a shot of the elephant. Feels vaguely Far Side, right? Overall, a FANTASTIC bit of toy soldiering...
If you would like to learn more, the chap who made them is named Matt, and you can find his info at...
http://games.groups.yahoo.com/group/wargaming_on_a_budget/
Oh, and he is apparently doing a Napoleonic army next. Be still, my beating heart!

Okay... on to the other games! Here is one, a Napoleonic game, that included some paper terrain pieces from Scott Washburn.

A Roman game... the pad is actually spraypainted and flocked automobile carpet. It sits very nicely, and really takes the shape of the styrofoam underneath.

A closeup of the Roman enemies... Celts? Or Gauls? I don't know the difference, sorry!:)

The enemy closes on the Romans... will my Italian ancestors hold them off?!

A 25mm ACW game, featuring a LOT of Sash and Saber minis. We were commenting that we particularly liked the rather extreme changes in elevation... honestly, you rarely see this on a wargames table, but it is fairly common in real life!

The Rebs prepare to attack!

Ahhh... one of the best looking games in the place; Dave Bonk's 40mm AWI game! This one was Stockton Hollow (from 1777) and featured the theme of the convention, some US Marines! Rules were Carnage and Glory II, a computer moderated game.

The colonials prepare to attack...

The Redcoats are ready too!

American officers urge their men forward...

British light infantry advances towards the bridge, ready to pepper the advancing colonials with musket fire.

American artillery is pushed up the road.

More Americans advance to engage the British.

The forces close and prepare to fire...

Reinforcements prepare to march out of their box and onto the battlefield!

Another nearby game was played over some nicely modeled fields of faux fir. It was an ECW game titled "Staffordshire 1643." Apparently the Royalists won both games (it was played twice!) Rules were Carnage and Glory II, a computer moderated game.

The forces prepare to engage... the figures are mostly Warlord Games, with a few Old Glory guys scattered among them.

I particularly loved the pine woods in the corners...

The mega-game of Tarawa... an absolute monster!

A table set and ready for a 20mm Vietnam game by the mysterious "Tom"... no figures had hit the table yet, unfortunately for me!

A 10mm ACW game... notice that the woods are designated by wood borders.

One of the 10mm ACW divisions prepare for battle... quite pretty!

A skirmish set in the Pacific... looked good when the troops hit the field, like a real mess!

A 10mm ACW game from Rick Dunn, using his own rules, titled "Sheridan's Stand." No news yet about whether or not he actually did, or ran like a coward.

A naval game of unknown scale... couldn't help but leave the Admiral in the photo!

Another Roman vs Unwashed Masses game! Lots of trees makes for a pretty visual.

The enemy gets closer... good luck, my Italian brothers!

Troops storm in a Pacific beach in a 25mm WW2 game.

Some BEAUTIFUL ships... looked even better when the smoke of the broadsides was on the board! The game was run by Jim Reynolds; the ships are resin 1/300 scale from Old Glory, and have metal accessories... very, very pretty, they almost looked like a painting!

Here we go... a BIG, beautiful 25mm SYW game. Ed Harding ran this beauty, which was Zieten's attack at Torgau 1760. The Austrians apparently managed to hold off the attackers. Rules were Carnage and Glory II, a computer moderated game.

A massive column of infantry advances across the table.

The Austrians prepare to be attacked.

Austrian officers call out orders to their men.

LOVE the fall foliage!

The column approaches the bridge...

... and the lines advance across the field....

... while the artillery begins to soften up the defenders!

It takes some guts to walk in big long lines right into musket fire... these men apparently have them in spades!

The attack presses closer...

Cavalry protects the flanks.

Both flanks, that is!

A truly beautiful game!

A 15mm naval game... all scratch-built ships, with huge crews already attached to the boards. Made it look very realistic!

Zombies! I wanted to play this one, but it sold out EARLY. Too bad, it looked neat, with fully modeled building interiors.

A ridiculously huge Alamo game. Not my thing, but still, folks looked like they were having a lot of fun... and the GM was popping up through the center, which is always a fun visual.

A modern day Iraq game.

Middle Eastern troops of an unknown origin advance to combat...

And the last shot... some more Napoleonics!
Anyway... hope everyone enjoyed some toy soldier shots... my last installment, the "What I Bought" piece will come up soon! Thanks for coming by!
Subscribe to:
Posts (Atom)